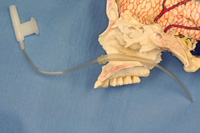
Step 1: Introducing the Airway into the Nasal Cavity

The Reltok Clear-Flo™ Nasal Airway System kit consists of:
The septal splints, nasal airway and suction catheter are for use during surgery. The irrigating syringe and tip are for post-operative irrigation.
INDICATIONS FOR USE:
The Reltok Ultra-Smooth Septal Splints are designed to stabilize the reconstructed nasal septum and prevent adhesions between the septum and other intranasal structures.
Reltok Clear-Flo™ Nasal Airway is used to provide nasal/sinus surgery patients’ immediate post-operative period with satisfactory nasal air flow, whether or not the nose is packed or has splints or stent placed within the nasal cavity. The device provides the anesthesia specialist unhindered access for pharyngeal and supra-laryngeal suction following completion of the surgical procedure, in the operating room or recovery room.
WARNING: As with any surgical procedure, care should be exercised in the insertion and maintenance of these devices.
PRECAUTIONS: Inspect package before use. DO NOT USE if package has been opened or is damaged. The contents of this package are for single use only. DO NOT re-sterilize. DO NOT use after expiration date.
CAUTION: Federal law restricts this device for sale by, or on the order of, a license physician.
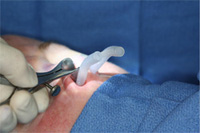
Step 1: Introducing the Airway into the Nasal Cavity
The Reltok Clear-Flo™ Nasal Airway is introduced at the conclusion of the operation before inserting any nasal packing or gels. For ease of insertion, lubricate the airway tubes with saline, ointment, or lubricating jelly. After initially inserting the airway partly into the nasal cavity, use a standard, thin-tip nasal speculum to inspect the nasal cavity to ascertain the position of the tubes.
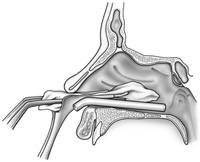
Step 2: Advancing the Airway into the Nasal Cavity
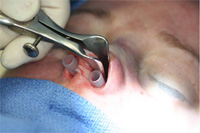
Using direct vision, advance the airway further into the nose. Next, use the inferior portion of the speculum blade or bayonet forceps to direct each airway tube downward onto the nasal floor.
Step 3: Airway Tube should Snap Into Place
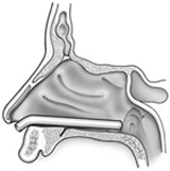
The airway tube will snap into place on the floor of the nose and maintain that position lateral to the pre-maxillary bone and medial to the inferior turbinate.
Step 4: Connecting Bridge Between the Airways
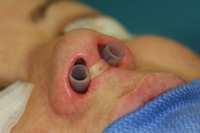
When both airway tubes are properly seated, the bridge connecting them will be flush against the columella.
NOTE: If an open rhinoplasty procedure has been performed, the surgeon may wish to divide the bridge and secure each airway tube separately, rather than have the bridge contact the transcolumellar incision.
The airway tube will snap into place on the floor of the nose and maintain that position lateral to the pre-maxillary bone and medial to the inferior turbinate.
Step 5: Flushing the Airway
After inserting and seating the airway, pass the 10 Fr plastic suction catheter through each tube and suction fluid from the pharynx. This maneuver also confirms that the back opening of the device is unobstructed. Later, the anesthesia specialist can use the same flexible suction catheter to remove blood and mucus from the throat.
Step 6: Packing & Stabilizing the Airway
While the packing of choice or gel is placed, the nasal speculum stabilizes the airway tube.


